Tuesday, November 29, 2011

Hey Pesto! Pasta

Hey Pesto! Pasta


I just love it when the herbs in the garden are bursting with love! I love the smell of the basil and mint when you brush past them or accidentally knock into them! Mmmmmmm, ok I’ll just pick myself back up off the floor!

So I had to make something scrumptious with the basil. First stop Pesto! I have put together a little blurb to show those of you that have never made fresh pesto, and if you haven’t, shame on you! It’s the best thing EVER and super duper easy.

Here is what you need:
Basil
Garlic
Parmesan
Olive Oil
Pinenuts
(ignore the Boccochini in the shot and bread, my bad)

Add to the food processor all ingredients in moderation, I used half the bunch of basil (approx 4 tablespoons), a couple of generous tablespoons of olive oil, 3 cloves of garlic, approx 2-3 tbsp pinenuts and about half a cup of parmesan cheese. Process until granulated paste. Add olive oil if required to make more moist.

Voila – Now you have pesto! You could add some lemon to stop it going brown if you wanted it to last a few days.

Now all I did was use it in a simple vegetarian pasta to use a punnet of gorgeous tomatoes.

Pasta Sauce
2 Tbsp Olive Oil
Pesto – to taste
Lemon
Punnet of Grape Tomatoes – sliced in half
½ cup Parmesan Cheese
250g Baby Boccochini Cheese balls

Heat oil in large frypan, add the tomatoes and fry them lightly. Next add your pesto to taste (I added alot), and season a squeeze of half a lemon’s juice and then season with salt and pepper. Simmer for 5 minutes.  Add your cheeses to the sauce.

Do not leave your sauce to cook longer then 5 additional minutes once cheese is added, as the tomatoes will turn to mush, and though the taste will be the same, its not near as appetising. 
I served 4 people with this dish.  I also used Linguine to serve the dish nicely, the volume of it soaked up the juices nicely.  After you drain your pasta, place it back in the sauce and then serve it onto the plates.  Sprinkle the served pasta with additional Parmesan cheese and cracked pepper. 

Friday, November 25, 2011

Halloween Cakepops!


I have gone through the ever popular pumpkin phase…. Thinking everything pumpkin is adorable and all things pumpkin is simply scrumptious!
So what better to make then Jack ‘O’ Lantern Cakepops!!! Cakepops… A fabulous craze started by www.bakerella.com that has caught on like wildfire. Everyone LOVES a Cakepop!
Its pumpkin all round…… I made a Pumpkin Spice Cake, in a pumpkin shape and decorated like a Jack O Lantern. How better to celebrate Halloween than with such a treat!
I know your probably dying to join me in making these little guys, so I have put together a step by step for you to follow me through how I got there. Have a blast!

Jack ‘ O’ Lantern Cakepops
4 large eggs
3 cups granulated white sugar
1 cup canola or vegetable oil (or 1/2 cup oil & 1/2 cup unsweetened applesauce)
3 cups all-purpose flour
2 teaspoons baking soda
1/2 teaspoon baking powder
2 teaspoons ground cinnamon
1 teaspoon nutmeg
1 teaspoon ground cloves
1 teaspoon allspice
1 teaspoon salt
2 cups pure (unsweetened) pumpkin puree (I used freshly boiled and processed)
2/3 cup water


Preheat oven to 180 degrees. Grease and flour a sheet cake tin (large rectangle).  In electric mixer, whisk together eggs, sugar and oil.
In a separate bowl, sift dry ingredients together(flour, baking soda, baking powder, cinnamon, nutmeg, cloves, allspice, salt) and then stir it into the wet mixture. Add pumpkin and water and stir until combined.
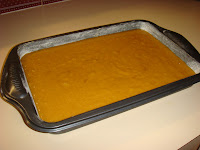
Pour the batter into the prepared cake tin. Bake for 1 hour, or until toothpick inserted in the centre comes out clean.
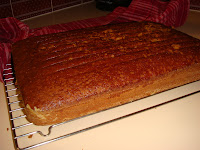
Turn out of pan after 15 – 20 minutes. Once completely cool, crumb the cake into a large mixing bowl.


Cream Cheese Frosting : http://www.recipegirl.com/2007/05/10/pipeable-cream-cheese-frosting/
2 (8 ounce) packages cream cheese, at room temperature
1/2 cup butter, at room temperature
2 1/2 cups powdered sugar, sifted
1 teaspoon vanilla

In a medium bowl, use electric mixer to combine cream cheese and butter; beat until creamy. Mix in vanilla, then gradually add the powdered sugar. Mix until frosting ingredients are completely combined. Check the consistency at this point. If it seems too soft, go ahead and add a little more sifted powdered sugar. If it seems too thick, mix in a teaspoon or so of milk. Use the frosting to fold into your cake crumbs. The mixture should be a sticky fudge like consistency. Wet enough to mould into shapes, but thick/stiff enough to hold shape.
Using a mini cookie scoop, scoop out mixture and lay on a baking sheet. Then roll balls so they are each tightly bound.


You will need for Cakepops :
  1. 50 rolled Cake Balls - refrigerated
  2. 50 lollipop sticks
  3. 1 packet or orange Candy Melts
  4. Approx 4 Tbsp Shortening
  5. Packet of Hershey Kisses (Baking Chips)
  6. Bottle green icing of your choosing that you can use to pipe on leaves & vine trendle
  7. Black 4mm sugar pearls (for eyes)
  8. Black Americolor Edible Texta for noses & mouths

 Follow the process to make the Pops through the Step by Step photos:
Using Cookie Scoop, scoop dough and release onto a Baking Sheet in rows.

Roll each scoop into a tight ball, and then shape into pumpkin. Place in fridge over night to set (min 6 hours)


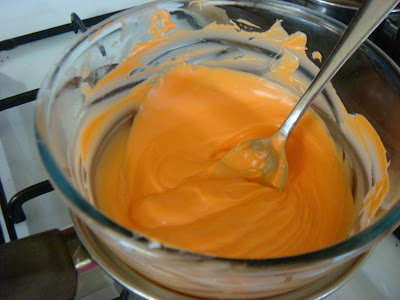
Using a saucepan of shallow water, sit candy melts in glass bowl over it, melt the wafers. Adding shortening to make a runny consistency.

Dip each lollipop stick separately into the melted wafers (Candy Melts) and  stick into the end of each cake ball. Sit stick up on tray and return to fridge to set.
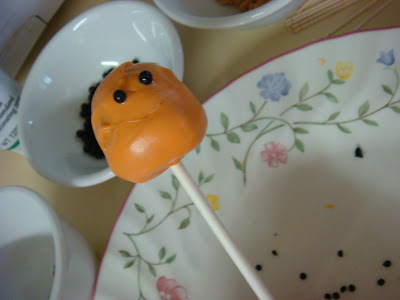
Then coat each cake ball in a thin layer of candy/chocolate

Immediately place on the eyes and nose and also the Hershey chip (stalk) as the candy melt chocolate sets very quickly.


Place into foam or a cakepop stand so they dry without touching.

SMILE!!

Now take LOTS of photos and marvel at your work!

Friday, November 4, 2011

SPOOKALICIOUS BIRTHDAY SPIDER CAKE!


A 7th birthday party the night before Halloween calls for only one thing... A spooky cake!

So I baked up a delicious jaffa cake (Chocolate and Orange) in sandwich pans. Using Marshmallow Fluff I mixed in icing sugar and green colouring and used the marshmallow as the cake filling.  I frosted the outside of the cake in an Orange Buttercream.

My inspiration for the design came from the ‘Limited Edition’ Vanilla Ice Cream Flavour Oreos that I found by chance... So I used spooky black Candy Melts and dipped each of the Oreos into the candy and then stuck on edible eyes. 


I stuck the spiders around the sides, then piped on the legs and webs to hang them by.  I topped off the Spookiness with a big black Bat Cookie covered in edible black glitter and a birthday message. 

Thank you Duncan Hines for your Devils Food Cake... I gave you one last shot and this time you didn’t taste like chemicals (as past 2 have), I recommend if you have to bake a few days out, to use a packets because the preservatives keeps the cake fresh and moist, freshly made cakes are best but if time doesn’t permit, no one minds a packet cake when you make up for it in style! 
Yummmmm!

Wednesday, November 2, 2011

Trick or Cookie Treat

Happy Halloween!

I had a few things to bake for, Tricker Treaters, Marley’s friends/babysitter and my work Call Centre Halloween Party!

So I mixed it up a little with some modern cookie treats. I baked my Chocolate Cutter Cookies, to try out a new design. As I am frequently as for prices, please note that the selling cost of these would be at $3.50 per cookie. Working on these did take a substantial amount of hours, but I read a Tips & Tricks made by http://hanielas.blogspot.com (a common pass time I have) but definitely the tip of adding warm water, the 10 second rule and letting the ready made frosting sit for a couple of hours before piping were all definitely great tips that enhanced my icing results.

Hope you enjoy my Halloween Cookies :