Showing posts with label Birthday. Show all posts

Tuesday, November 5, 2013

White Chocolate & Raspberry Celebration Cake


Again I am still do Blog Post delayed catch ups, this one is from my daughter's 4th birthday.  She requested raspberry cake.... again. Along with Orange Sponge Cupcakes.  So here is the cake I made for the bottom layer in her Lalaloopsy Birthday Party Cake.

This cake tastes delicious, but I ensure I use a good quality white chocolate, I find the cheaper cooking ones just taste bitter a bit like cardboard.  So my fav is Cadbury Dream, but my 2nd Choice is Nestle Plaistowe.

White Chocolate & Raspberry Celebration Cake

250g Castor Sugar
180g Butter - room temp
465g Plain Flour (less 3 Tbsp)
3 Tbsp Cornflour
3 tsp Baking Powder
3 Eggs
375ml Milk (I used 50% lite milk & 50% Buttermilk) - room temp
270g White Chocolate (Good Quality, I use Cadbury Dream) - chopped
Raspberries - Frozen

Preheat oven to 180 degrees.  Grease
and flour cake tin, I used a 10 inch springform pan.

Cream the butter and sugar together in an electric mixer on medium speed.  When pale and fluffy you can add in the eggs one at a time until fully combined.
Sift your dry ingredients together in a separate bowl and whisk to ensure the raising agent and cornflour are dispersed throughout flour well.

Take your milk and your dry ingredients and add them into the butter mixture in alternative additions, once fully combined take the bowl out of the electric mixer.

Chop your white chocolate up into very fine pieces and stir into the mix with a wooden spoon.  Next take your frozen raspberries and stir them lightly through the batter.

Pour the mix into your prepared cake tin, and place into the preheated oven, and bake for 45-55 minutes.  Always check the centre of the cake with a wooden skewer to ensure the centre is cooked and not raw, this is done by sticking it in when you pull it out it should be clean without mixture stuck to it.  Your should turn out the cake once it has cooled for at least 15 minutes.

Once your cake is completely cold (I usually also placed wrapped in gladwrap/clingfilm into the freezer to ensure it is extra cold), it is ready to frost, ice, ganache and if so desired cover in fondant like I did!

Here is the Dessert Buffet setup I did for my daughter's birthday, we went with a Hot Pink and Sunshine Yellow theme in her favourite doll sesries called Lalaloopsy Dolls.

And.... these are a close up of the uniquely self designed Cookies and Choc-Coated Oreos!
 

And here are the Take Home Favours I made for all the little girls and boys!! Such fun!

I had the designs for my stickers, invitations and tags made through Lala Heaven on Etsy.com, here is her link : https://www.etsy.com/shop/LalaHeaven?ref=search_shop_redirect Katie is fabulous and fast, I found no request too great for her, she even personalised these gorgeous stickers of Dyna-Mite after she met the live doll, for me which I put on boxes of my daughter's favourite treat - Milk Duds!


Sunday, January 27, 2013

Cookbook 1 : Miette - Double Chocolate Cake

First of my Cookbook Challenges for the year, I have chosen a gorgeous looking one from a San Francisco Bakery called Miette. It has the prettiest layout with scalloped pages, my Mum took one look at it on my coffee table last year and fell in love with it.  I even bought it for 2 birthday gifts in 2012 because its such a stunner!

So make sure you put this on your birthday list this year, available at www.thebookdepository.com (free shipping worldwide):


The cake itself is a wonderful thick chocolate cake, so moist and lucious.  I have made it in a triple layer and a double layer, I highly recommend the effort of a triple layer in the 6-7 inch tins, I felt that it was glorious with the three fudgey layers with ganache in between.

Double Chocolate Layer Cake

1 1/2 cups Plain (all purpose) Flour
1 1/4 cups Unsweetened Cocoa Powder
1 1/2 tsp Bicarb (Baking) Soda
1/2 tsp Baking Powder
3/4 tsp Salt
2 Ounces 70% Cacao Chocolate - chopped coursely
1 cup Boiling Water
1 cup Buttermilk (I use my previously advised subsitute of 1 cup full cream milk with a Tbsp Lemon Juice)
1/2 tsp Vanilla Extract
2 Large Eggs - room temp
1/2 cup Vegetable Oil
2 1/4 cups Castor Sugar

Grease your tins extremely well, I go against my rule of grease & flour for this one to avoid a floury coating on your cake layers. If you prefer to dust your pan you can do so with cocoa.

Pre heat your oven to 350 (180) degrees.

Firstly sift your dry ingredients into a large bowl, this is your flour, cocoa, bicarb soda, baking powder and salt. Set aside.

Place your chocolate in a large glass or metal bowl (heatproof), pour your boiling water over the top of it and stir until the chocolate is completely melted.  Set aside and let it cool for 15 minutes.

Prepare your buttermilk if your like me (I take one cup of full cream milk and add a squeeze of fresh lemon until it curdles) and then add your vanilla to it. Set aside

Using your Stand mixer, place your eggs into the bowl and whisk on high until foamy (approx 2-3 minutes), reduce to low and pour in your oil and whisk until combined. Raise the speed for approx another 30 seconds.

Reduce back to low and slowly pour in the cooled chocolate into the egg mixture.  Next slowly pour in the milk vanilla mixture.  Then add in your sugar and whisk until the batter is smooth and liquid, approximately 2 minutes.

Next stop the mixer and remove the bowl, add in your sifted ingredients and mix in by hand until combined, ensure your run your spatula along the bottom of the bowl to ensure it is all combined well.  The batter will probably still appear quite lumpy but stop mixing it as over mixing will bruise the raising agents.

The final step is a little unusual but it definately produces a more superior cake finish.  Take a seive not too fine, and pour your mix into it, using your spatula and push through the lumps, discard any lumps that down easily push through the sieve.

Divide your mixture into your prepared pans and bake each one for approximately 45-55 minutes depending on your oven.  To test stick centre of cake with a skewer and check it comes out clean.

Let cool in pan for 20-30 minutes and turn out onto a wire rack and allow to completely cool.  Once cold wrap in 3 layers of gladwrap (cling film) and place flat into the freezer.  You can store in the fridge or freezer from 1 hours to 3 days, I prefer overnight.  It can store in freezer for up to 2 months. Ganache a cold cake for the best results.

Helpful Notes in Miette Cookbook (Quoted Below from pages 18 and 55) :

  • "We use natural cocoa powder not dutch-processed, as the dutch-processed cocoa has been treated with an alkalizing agent that heightens the colour of the cocoa but gives it a milder flavour".
  • "If you choose to use this recipe for cupcakes, fill each cupcake liners with 2/3 batter and bake at 350 (180) degrees, and bake for approx 20 minutes, makes 2 dozen cupcakes".
  • "Adding Eggs - Add your eggs slowly and carefully, this process simply cannot be rushed as you are emulsifying a liquid into a fat.  If not done gradually you risk 'breaking' the batter, the termfor when the fat and liquid that are beginning to hold together in a mixture suddenly seperate again.  Add eggs one at a time and ensure they are fully mixed in before adding the next."

Thursday, September 27, 2012

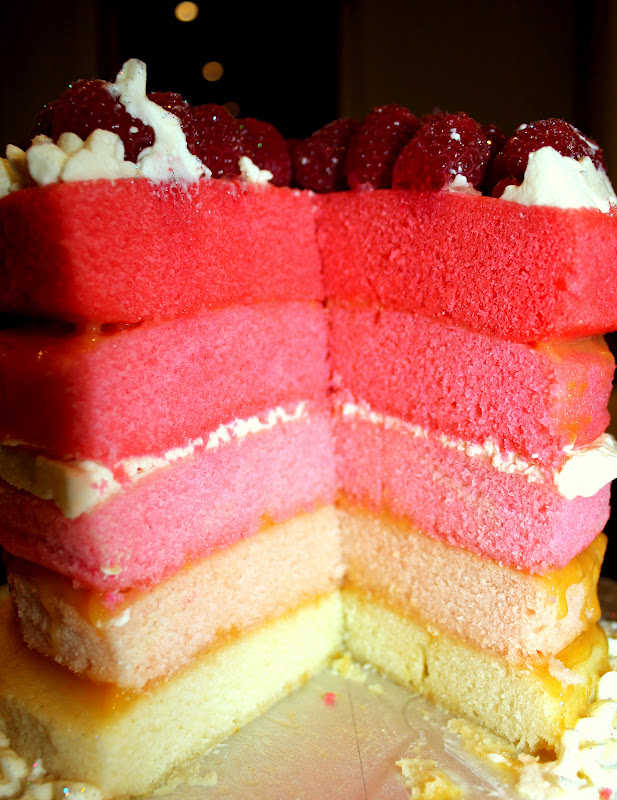
Challenge No 6 - Pink Ombre Cake with Raspberries & Lemon Curd

Month 6 - June
Blog 6 - Sockerrus www.sockerrus.se

Recipe 6 - Ombre Cake http://sockerrus.se/2011/07/20/blue-rainbow-cake/


Now this is a cake that has been on my hit list for about a year, I originally saw it on a Swedish Website which is the Sockerrus Blog where you can see some fantastic cakes designs, ideas and recipes.  You just need to hit "Translate to English" up on the right hand side.

The funny part is I had my heart set on making this for sooooo long, and I have now made the cake itself three times in total in under 2 months, and everyone constantly comments how delicious the cake is. Its a White Velvet Cake, which I had never actually heard of, but it is a very fine compact crumb. Therefore the texture is really lovely to eat, and soft and can make a decent cake even when thin layers are required.

I doubled the cake batter, so feel free the halve this recipe for a small cake.  Also I thought I would put cream in centre layer, I felt it ruined the look a bit and I have to take it by car to my brother's (about a 15 minute drive) and the cream layer cause the top layers above the cream to slip off. Definitely keep it to just the lemon curd and save the cream for the top. So forgive me the the final cake doesn't look as good as it should, it slipped apart in my car....

Here is the cake (which as mentioned I doubled)

White Velvet Cake

135g Egg Whites
250g Milk
1 1/2 tsp Vanilla Essence
300g Castor Sugar
300g Plain Flour
1 1/3 Baking Powder
1/4 Salt
170g Butter - room temp

Food Colourings - used Americolor Electric Pink and Rose
Punnet Raspberries
300ml Whipping Cream
Tbsp Sugar
300-600g Lemon Curd

Preheat oven at 350 degrees.

Grease and flour at least 2 x 8 inch tins.

Whisk together the egg whites, milk and vanilla in a small bowl, and set aside.

In a large mixing bowl sift together the flour, castor sugar, baking powder and salt.  Add in the softened butter and mix in gently.  Add a third of the egg milk mixture, repeat twice until mixed in completely.

Your batter is now ready, so divide it evenly into 5 bowls, i recommend you use 5 bowls of the same kind and size so you can measure consistently.  Once divided into 5 bowls, leave first bowl as natural, add one drop/tiny blog to 2nd bowl and stir, add a larger amount to the 3rd bowl, change to darker colour and add small amount to ensure it darker than 3rd bowl, finally add a larger amount of colour to the 5th bowl.

You should end up with 5 layers of graduating colour in separate cakes.

Bake each layer/tin separately on the middle shelf in the oven, for 15-20 mins, check the cake springs bake touching the centre of it to check it is cooked enough. It should be firm and spongy.

Remove cake tin, allow to cool for 15 minutes and then turn cake out of the tin onto a cooling rack.

Make the lemon curd and place into the fridge to cool.

I recommend freezing your cake layers for just a couple of hours to get them firm and cold before cutting, trimming and layering them as you will get a much better result.

Finally layer up your cake, putting lemon curd between each layer, and finally top it with cream and raspberries. Edible glitter compulsory!

Here is what this delicious number looked like on the inside!!!! Delightful!!

ENJOY!


Friday, November 4, 2011

SPOOKALICIOUS BIRTHDAY SPIDER CAKE!


A 7th birthday party the night before Halloween calls for only one thing... A spooky cake!

So I baked up a delicious jaffa cake (Chocolate and Orange) in sandwich pans. Using Marshmallow Fluff I mixed in icing sugar and green colouring and used the marshmallow as the cake filling.  I frosted the outside of the cake in an Orange Buttercream.

My inspiration for the design came from the ‘Limited Edition’ Vanilla Ice Cream Flavour Oreos that I found by chance... So I used spooky black Candy Melts and dipped each of the Oreos into the candy and then stuck on edible eyes. 


I stuck the spiders around the sides, then piped on the legs and webs to hang them by.  I topped off the Spookiness with a big black Bat Cookie covered in edible black glitter and a birthday message. 

Thank you Duncan Hines for your Devils Food Cake... I gave you one last shot and this time you didn’t taste like chemicals (as past 2 have), I recommend if you have to bake a few days out, to use a packets because the preservatives keeps the cake fresh and moist, freshly made cakes are best but if time doesn’t permit, no one minds a packet cake when you make up for it in style! 
Yummmmm!

Sunday, October 9, 2011

Next Stage in the Cookie Kitsch’n – Taking Your Orders

I am trying to move this Kitsch’n onwards and upwards… I recently set up a Facebook page to get myself into the year 2011. I was surprised (very happily) that it reached 33 Likes in under a week and half a dozen of these were people I didn’t know! The next step is to add an order form to my page. I set up the order form however it appears that Facebook have (in August) stopped the use of FBML apps being added, so I have hit a minor brick wall and I am trying to now work out how to get around it.  The form is great and it uses Paypal to process the order with delivery costs and allows me to setup the 3 pricing categories.  I find there is nothing worse than browsing a site or catelogue without any prices, if you feel unsure about where your cookie design falls in the 3 categories below, just contact me on email at cookiequeen@y7mail.com.  I am based in Sydney, Australia so at this stage I am baking for Australia based customers.  Customers within Sydney can have pick up or delivery, everywhere else in Australia it is postage through Australia Post or Courier Delivery.

I have broken the Cookie Styles down to 3 easy price brackets :

Plain Cookies (Fondant Covered) - $3.00 each


Decorated Cookies - $3.50 each


Cookie Pops and Images/Photos - $4.00 each


Cookies can be designed to suit or match your party and guest needs.  It is only limited to your imagination. It is recommended and preferred to place your cookie order at least 14 days in advance to ensure you don’t miss out on the date you require your cookies for.  All cookies are handmade with fresh ingredients.

I look forward to working with you to make your next occasion extra special!

Sunday, September 11, 2011

Hunka Hunka Burning Love!!!

Anyone looking would think I have the Elvis fetish.... I don’t... but he intrigues me, in fact the whole Elvis Phenomena has me momentarily spellbound.

The craziness of it all, I mean yes he was a fantastic singer, writer, performer, entertainer etc and he was ground breakingly daring for his time, but the fans are mental! They are. Really.  Who on earth lays dead for over 30 years of a heart attack in the prime of their career and “fakes it”??  Seriously people, the sightings at the burger joints are definately hilarious, but it draws you right in with the conspiracy theories. Is he or isn't he??

I also have to confess.... I have a dislike to animal print, you will rarely see me condone it, especially when it comes to children. myself or house furnishings.... I once sent my partner to buy a cat scratching/hammock pole thingie with one single rule to remember... “NO Animal Print” and what did i get?? Yes... Leopard print... O.M.G. hideous! (Apologies to anyone you does like animal print) Rock & Roll, Hot Rodding and the Zoo are the only places this belongs... Elvis does fall into the allowance (under the rock & Roll banner). And it really suited the Hunka Burning Love Cupcakes I baked!! 


I have made Elvis Cupcakes on two occasions, once were the Hunka Burning Love Cupcakes I am providing you with the recipe below, and the second Cupcakes were vanilla Cupcakes with Pineapple Buttercream and decorated in the Elvis theme for a 40th celebration.

I hope you enjoy making these as much as I did!

Hunka Burning Love Cupcakes

Banana Cupcake
125g unsalted butter, melted
3/4 cup castor sugar
2 large eggs
½ teaspoon pure vanilla extract
1 ½  cups all-purpose flour
1 teaspoon baking powder
½  teaspoon baking soda
pinch of salt
2 ripe bananas

Peanut Butter Cream Cheese Frosting
2-3 tbsp smooth peanut butter
250g packet cream cheese, softened
2  cups icing sugar mixture
1 tsp vanilla

Topped with Maple Syrup Glazed Bacon and a drizzle of Maple Syrup (honey can be substituted)

Pre-heat oven to 350’ or 180’.
Cream butter & sugar together with electric mixer, approximately 3 minutes. Add eggs one at a time and then the vanilla, beat until combined and fluffy.  In a separate bowl sift in all of the dry ingredients. Then mash up the bananas with a fork and add them into the mix.  Next add half the dry ingredients into the egg mixture, mix until just combined.  Add in the milk and then the 2nd half of the dry ingredients.  Be very careful not to overmix as you will bruise the flour and it will make a tough cupcake without spring in its step!

My trick is ‘soup spoons’ using the font of one to scoop the mix out and the back of another to push the mix off the 1st spoon into the patty cake wrapper.  Use 2 spoons of mix into each patty cake wrapper, 2/3 full. Bake for approx 20, just lightly firm to touch with a quick spring back.

Let cool before frosting.

To make the frosting add all the frosting ingredients into the mixer and use the paddle attachment. Mix into a whipped cream consistency, and then its ready to pipe onto the cakes.

For the bacon topping, slice the rashes (2) into 1.5 inch squares, heat frypan and drizzle approx 1-2 tablespoons of maple syrup into the pan first and heat.  Next add the bacon and pan fry until golden and crispy.

Top your cupcake using a closed star tip, and insert your crisp of bacon and lightly drizzle with about a ¼ - ½ teaspoon of maple syrup.

I got 18 small size cupcakes from this mix, otherwise it would get 12 large cupcakes.