Showing posts with label Blogs. Show all posts

Saturday, December 14, 2013

The Great Food Bloggers Cookie Swap of 2013 - Maple Pumpkin Gingerbread Cookies


HO HO HO and its a very Merry Christmas with only 11 days remaining to the big day.  And it's another year of the Annual partaking in the Food Bloggers Cookie Swap.


A couple of months ago I have made the decision along with my partner to turn my part-time Cookie Business into a Fulltime Working At Home Mum (WAHM) Business, and since then it has been super duper uber crazy busy! Parties, Events, Corporate Orders and Market Days have kept me run off my feet every single week.  So it was definitely a squeeze to get the 36 cookies required completed for the swap given I insist on producing decorated cookies. AND as usual my definition of a Christmas Cookie is definitely a gingerbread variety...  and I have to say I did excel as far as taste for my family, they deemed it a great look and tasting cookie all round.  Even my Miss 4 ate several and even insisted on taking a 'doggy bag' of them to her Nanny's house on her sleepover.  They did puff nicely the first roll out of each lot of dough, a note is to knead the dough back together well before re-rolling it to avoid distortion and shrinkage in cutter shapes.

Maple Pumpkin Gingerbread Cookies


1/4 cup Butter - softened
1/4 cup Brown Sugar - firmly packed
1 Egg
2 Tbsp Molasses
1/2 cup Maple Syrup
1/2 cup FRESH Pumpkin Puree
1/4 cup Water
3 1/2 cups all-purpose Flour
1 1/2 tsp Ground Ginger
1 tsp Bi-Carb (Baking) Soda
1/2 tsp Salt
1/2 tsp Cinnamon
1/4 tsp Ground Nutmeg
1/4 tsp Cloves
1/4 tsp Ground Black Pepper

Place pumpkin diced into a saucepan of water and boil until soft, drain and put through the food processer until a puree.

Place butter and sugar in the electric mixer and mix until light and fluffy.  Then add the egg and combine well. 

Add in the molasses, maple syrup, pumpkin and water and mix well on medium.

In a separate bowl sift together the dry ingredients and whisk them through so the raising agent is spread throughout.  Then add all at once to the wet/or pumpkin mixture in the electric mixer with dough hook.  Mix on low speed until a ball of pliable dough.

Take the dough out of the bowl and knead it on a floured surface.  Make 2 large discs of dough and put in glad wrap/cling film and place in the fridge for 4 hours (or overnight).

To Make Cookies :

Pre-heat over to 160 degrees.
Remove from the fridge, allow to sit until the dough is rollable, roll out the disc and use cookie cutters to cut out your cookies, place them on a lined cookie tray.
Bake for 15 minutes - check for golden colour as they may need more time depending on your oven.
You can decorate how you wish, I used Royal Icing.

I credit the Blogger Courtney from Sweet Tooth Sweet Life for these gorgeous cookies :
http://www.sweettoothsweetlife.com/2010/12/08/maple-pumpkin-gingerbread-cookies/
I thought these were easy and great, but I did opt to make my own Pumpkin Puree just because I hate pumpkin from a can, I don't think it tastes the same at all, plus you avoid unnecessary preservatives.

I have received 3 Cookie Packages from my fellow Cookie Swappers, their details and pics are below, so far I have nibbled at each package and they taste great! Thank you so much lovely ladies. 

Thank you and my Cookie Bakers for 2013 were :

Alicia from The Kitchen and the Camera :
http://www.thekitchenandthecamera.com/2013/12/white-chocolate-cranberry-shortbread.html

Kate from The Cook's Companion Challenge :
http://cookscompanionchallenge.blogspot.com.au/2013/12/301984-passionfruit-shortbread-biscuits.html

Giulia from Love At Every Bite :
http://www.loveateverybite.com/dolci-desserts/great-sweet-food-blogger-cookie-swap/


If you missed out this year but don't want to miss out in 2014, just sign up with your email here so you get the notifications when the swap is taking names next year : http://eepurl.com/qCABj


Friday, March 1, 2013

Mystery Cookie Cutter Challenge with Cristins Cookies

I decided to join in the Challenge this month that Cristin put up for 12 lucky people to join in on, she makes a cutter herself, with her own hands, and you go to her Etsy store, purchase the cutter, cross your fingers and hope you got in, and then wait til it arrives whilst you conger up ideas to make it into!  Then it arrives and you make your cookie with tender loving care, I chill the dough to ensure my cookies keep their cutter shape near to perfect... then comes the icing!

Here is the link to Cristin's Page to take a peek at her gorgeous work :

Sooooo.....

I made a few designs, but hoped my number 1 turned out (which it did Im pleased to say)!  Here is a sneak peek at my other cookie cutter designs....


Here is the Cookiers and there links that all participates in the Challenge with me on the 22nd February 2013.  In case you are wondering, my cookie is #9, and he is Max from the book "Where The Wild Things Are".  I saw the cutter and wanted to not make the obvious, so an owl was out, and all I saw was Max!


1)    Michelle of Wonderland Cake and Company Co2)    Heather of Twins Plus One Goodies3)    Leah of Simply Eden Baked Goods4)    Amy of One Preppy Cookie5)    Maria of Homemade Cupcakes, Cookies & More6)    Elaine of Elaine’s Sweet Life7)    Megan of Sweet Baketique8)    Beck at Strawberry Giggles Edible Gifts9)    Traci of Cookie Queen Kitschn (Me!)10)  Channing of TheCookieMaster11)  Cristin of Cristin’sCookies


Here is a super close-up of my Max! Isn't he just too cute? Growl!

Also here is my little Max from Where The Wild Things Are.... without his gold crown!

AND FINALLY last but certainly not least I have to make special mention to Cristin's little Cookie, Abigail. This is Cristin's baby grandaughter where she gets all her latest inspiration, if you follow Cristin you will know that alot of the little animals come from Abigail's baby clothes, tooooo cute! A very lucky little girl.

Thursday, January 10, 2013

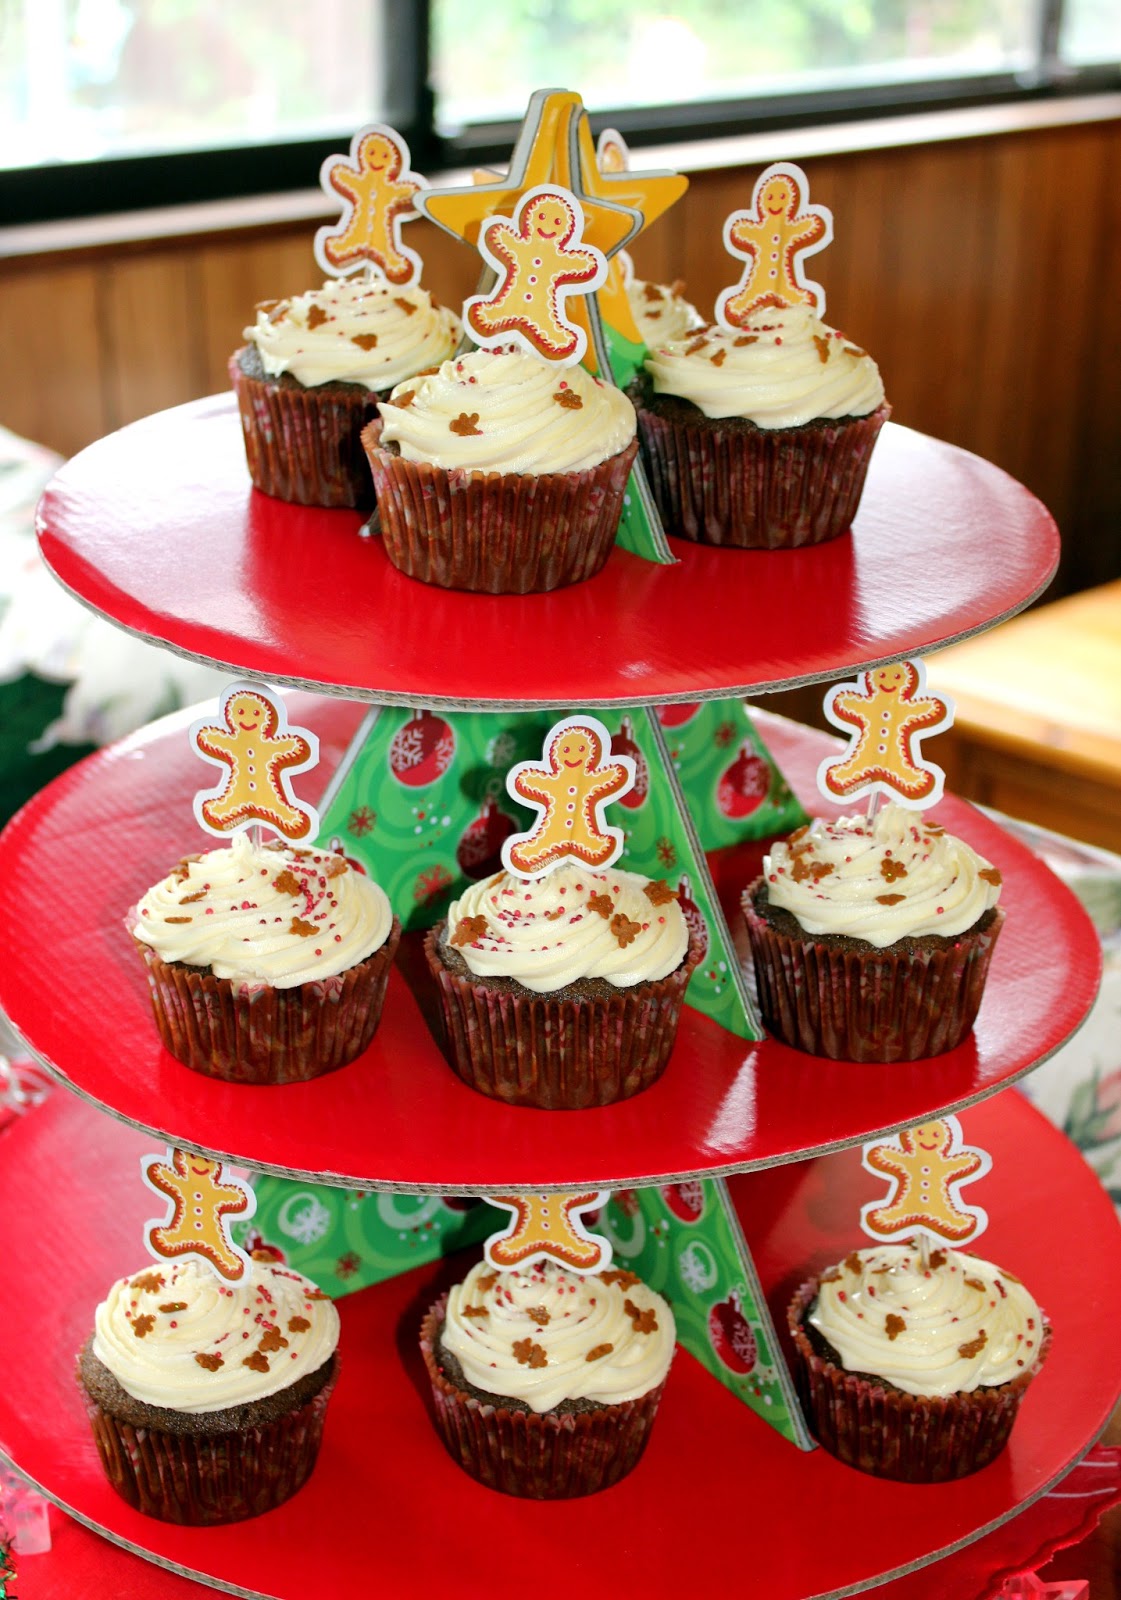
Challenge No 12 - Christmas Gingerbread Man Cupcakes

Month 12 - December
Blog 12 - Tidy Mom http://tidymom.net/

Recipe 12 - Christmas Gingerbread Man Cupcakes http://tidymom.net/2011/gingerbread-cupcakes/

I have no idea what has happened... but I cannot locate any step by step photos I took of making the actual cupcakes %;'&*? What the?? But on the other hand I have some really nice pics of the finished product, and isn't that the main thing? I am certain it is. Ok so I'll stop convincing myself lamely now and apologise to all my peeps for the absence of the step by step pictorial, they are super easy peasy so go for it and bake a batch this holiday season. You will adore them!

Christmas Gingerbread Man Cupcakes


1/2 cup Vegetable Oil
1/2 cup Castor Sugar
1/2 cup Molasses
1 Egg - room temp
1 1/2 cups Plain (all purpose) Flour
1/2 Tbsp Ground Ginger
1 tsp Ground Cinnamon
1/2 tsp Salt
1/8 tsp Ground Cloves
1/2 cup Boiling Water
1/2 tsp Bi Carb (Baking) Soda

Pre heat your oven to 180 (or 350) degrees.  Line your cupcake pan with patty wrappers or grease and flour well.

In your mixing bowl combine your sugar, oil and molasses and put mixer on medium and mix well.  Then add in your egg and mix until combined.

Sift all your dry ingredients into a large seperate bowl, whisk them lightly together, be careful not to whisk much as you will bruise the flour and raising agents.  Gradually add the dry ingredients into your wet mixture and stir through gently.

Boil your water in a small saucepan, once boiled, remove it from the heat and stir in the Baking (Bi-carb) soda.   Whisk it quickly then into your cake batter.

Take your batter and fill each cupcake wrapper approximately two thirds (2/3) full, and tap it on the bench to remove air bubbles and place pans in the oven on middle shelf and bake for 20-25 minutes.  Test before removing from the oven that you cupcakes spring back when touched, or that a skewer comes out clean once put through the centre of a cupcake.

Frost your cupcakes once they have completely cooled down.

The frostings I found most compatible with these cupcakes are a Toasted Marshmallow (preferably boiled) or a Lemon Buttercream.

Saturday, January 5, 2013

A Cookie Queen Kitsch'n Year in Review - 2012 as it was!

Top 5 Posts (in the order from 1 (#1) to 5) :

  1. Maggie Beer's Roast Chicken with Parsnip Pear Mash
  2. Minnie Mouse Dessert Buffet Table
  3. Masterchef Mojito Time
  4. Let's Kick off the Silly Season
  5. No 1 Challenge Caramel Apple Cheesecake Slice

BIG Events of 2012 Recap in Pics:

Miss M turned the BIG 3!

She was in awe of her Dessert Buffet, see link above for all that was available for it. As I love EVERYTHING to be edible on my cakes, I even covered wagon wheels in black fondant for ears on the cap!

Our trip to Disneyland and on the Disney Wonder Cruiseship!

(New towel animal every night & was tickled pink to meet all the Disney Charcters on board and at Disneyland itself)


Billy Law's Halloween Fancy Dress Dessert Degustation Dinner

(Where we jointly won 1st & 3rd Prize for our Costumes Mad Chef & Cupcake Whore!)

Christmas Celebration 2012


Yes in case you haven't guessed it yet from my Facebook Page, I do indeed LOVE Adriano Zumbo and all he creates! I look forward to having you join me throughout 2013 for even greater adventures and events. Hope to see you all there with me. Mwa! xxx

Christmas Loot for a Baker....


Totally in love with my new Kenwood kMix Food Processor, its HUGE! No idea where Im actually gonna store it permanently when not in use, that is my Kitchen Aid next to it.... its massive and there is a whole thing of fancy attachments including little twin baby whisks that attach inside it to be a mixer! Wowza, can't wait to test it all out, currently in the midst of using it to make Macarons, my 2nd attempt ever. Fingers crossed very tightly!

Wednesday, January 2, 2013

The Great Food Bloggers Cookie Swap 2012 ... continued - My 3 Blogger's Cookies Received

As per my 12th December post on The Great Food Bloggers Cookie Swap 2012, I took part in the Cookie Swap again this year, and I received all 3 dozen of my cookies from 3 absolutely fabulous Bloggers.

They all tasted delicious, which I was thrilled to share with my partner and family over Chrissie, I want to take this opportunity to thank the bakers for their goodies, each one came in a uniquely gorgeous packaging from boxes to tins and made the whole experience really fantastic!

Here is a rundown on what I received this year and the links to the wonderful recipes you can try at home.

1st Cookie Swap Package :

From Manuela Zangara at http://www.manusmenu.com/
Baked me : Chocolate Cookies with an Orange and Mint Glaze


2nd Cookie Swap Package :

Baked me : Strawberry & Rhubarb Spiral Shortbread


3rd Cookie Swap Package :

Baked me : Espresso Chip Oatmeal Cookies
I also received a lovely letter telling me all about Catie, her adventures, ambitions and the cookies.  By the time I finished the letter I felt like we were old friends/penpals.

I hope I have done all your cookies justice in my photo skills, I have definately improved on the photography and editing skills this year.  And Ive been lucky enough to receive a new lens, filter and tripod from my brother for Chrissie so things are going onwards and upwards!  Looking forward to seeing you all in The Great Food Blogger Cookie Swap of 2013!!!

I sent my Gingerbread Nutcrackers out to the following Food Bloggers :


Sara from http://bellyrumbles.com/2012/12/great-food-blogger-cookie-swap-2012-slice-bake-cookie-recipe/

V Vien Lee from http://wedarefood.blogspot.com.au/2012/12/the-great-food-blogger-cookie-swap-2012.html#comment-form

Thursday, December 13, 2012

2012 The Great Food Blogger Cookie Swap


I am so excited to once again to take part in The Great Food Blogger Cookie Swap, this is the 2nd year it is running, and it runs internationally with it being mandatory that there is at least 4 Food Bloggers that enlist in your country to qualify.
I am actually super excited as my 1st Cookie Swapper sent me one of my cookie packages already and they smell soooo delicious and chocolaty its seriously not funny. My household has been pestering to eat them for the past 2 weeks, so they are in lock down! The cookies that is.

As I used my traditional family gingerbread recipe last year and opened up the vault and shared it with you all already, this year I have taken a recipe from one of my Cookie Idols and I have made them and used her design to show that the Cookie Queen Kitsch'n can implement any design that takes your fancy (within reason of course hee hee)..  I thought these little Nutcrackers were gorgeous and I have been itching for over a month to start these babies up!

The Gingerbread is based on Orange and Molasses and I wasn't sure how it would go, but I LURRRRVE gingerbread so it wasn't hard to please me and on many nights I have wanted to devour the lot... in fact I even made a whole extra 12 cookies just so I get to keep some myself this year (which i never ever do)!

So here we go......

My recipe is from Sweet Sugar Belle Adventures, here is the link I used:
 sweetsugarbelle.com - Nutcracker Ornaments
Now brace yourselves for a wonderful aroma that you are about to enter into when you bake up this baby, its like entering a world of Willy Wonker in the Gingerbread land...

Orange Molasses Gingerbread Nutcrackers

(as usual I have made some slight adjustments to the recipe)

1 cup Butter - room tempreture
1/2 cup Castor Sugar
1/2 cup Dark Brown Sugar
1 1/4 cup Molasses
2 Eggs
1 tsp Orange Rind
1 Tbsp Orange Juice
5 1/2 cups Plain Flour
1 tsp Bi-carb Soda
1/2-1 tsp Salt
2 tsp Ground Ginger
3 tsp Ground Cinnamon
1 1/2 tsp Ground Cloves
2 tsp Ground Nutmeg

Pre heat oven to 190 (or 375) degrees UNLESS you do what I do and chill dough in fridge overnight.

Cream together the butter, castor sugar, brown sugar and molasses, they will become a thick silken mixture that looks devine. Personally - I start with the paddle attachment and swap to the dough hook when I begin adding the dry ingredients.

Whilst you cream the above, sift all of your dry ingredients into a large bowl and set aside.

Add the eggs one at a time and mix them in well, then add in your orange rind and juice.  Using a cup measure, add your dry ingredients a cup at a time into your wet mix in your mixer, and eventually after a few minutes it will start to form a dough.

Once the dough has formed into a ball, remove it from the mixing bowl, and split it into 3 balls, flatten the balls into discs and wrap in cling film (or glad wrap), and place into the fridge for at least an hour.  This will chill and firm up your dough for rolling.

It is recommended to roll this dough between baking paper but I personally just rolled it out on a floured surface, and it was easily managable.

Roll and cut out your cookie shapes, place them onto baking paper lined tins, bake them for approximately 10-15 minutes, depending on the size of your cookie. They will brown up a little but should be baked longer then 20 minutes or else they will burn.

Wait for your cookies to be completely cold before you set about icing them, otherwise the icing will heat and run.

Decorating Stages:

Stage 1 - Pipe your outline of the green hat and red chest.
Stage 2 - Flood or fill the green area
Stage 3 - Flood or fill the red area
Stage 4 - (wait overnight) Pipe the face/skin tone of choice
Stage 5 - Flood or fill the face area
Stage 6 - Pipe on the darker green triangles onto green hat
Stage 7 - (wait overnight) Pipe on the nose
Stage 8 - Flood or fill the cravat with yellow
Stage 9 - (wait a couple of hours) Pipe on black eye dots
Stage 10 - Pipe on the black buttons onto cravat
Stage 11 - Pipe on red mouth dot
Stage 12 - Pipe on black moustache
Stage 13 - Pipe on red dots onto hat
Stage 14 - Optional (wait overnight) Pipe on white line on hat trim and coat with white non-pariels


HO HO HO MERRY CHRISTMAS TO ALL!

STAY TUNED... for my post soon on the delicious cookies and who baked them with linky links to their fab blogs once I receive them all as I have one to go!