Showing posts with label Chocolate. Show all posts

Friday, December 18, 2015

Great Food Blogger Cookie Swap 2015 - Salted Double Chocolate Caramel Stuffed Cookies

I have once again joined the The Great Food Blogger Cookie Swap which runs annally each year internationally, and is hosted by : Julie Tran from The Little Kitchen  & Lyndsay Landis from Love & Olive Oil.

This year I have opted out of my decorated cookies because with my business I just have not had the time to stretch myself.

So this year we have my favourite cookies which are totally delicious!!!

Salted Double Chocolate Caramel Stuffed Cookies

Ingredients
2 1/2 cups Choc Chips (I do dark to get the rich colour result)
1/4 Cup Butter
3 Eggs
1 Cup Golden Castor Sugar (for extra special flavour)
2 tsp Vanilla Essence
1/2 tsp Salt
6 Tbsp Plain Flour
1 tsp Baking Powder
3 Tbsp Dutch Cocoa
2 tsp Chocolate Spice Mix
20  Caramels - cut in Half (I use Columbines as I am in Australia)
Fleur De Sel (Salt on top to bake)

Makes - 24-30 Cookies

Method
Place 1 1/2 cups of choc chips into a double boiler and melt and combine in the butter.

Place the eggs. sugar, vanilla and salt in the mixer and mix together thoroughly.

Swap to a spatula/wooden spoon. Then add in the flour and baking powder along with the cocoa, chocolate spice mix (I purchased from a German Spice Shop in the Strand Arcade Sydney - Gewurzhaus) and mix together very well so there are no white streaks present.


Cover and place in the fridge for 1-2 hours.

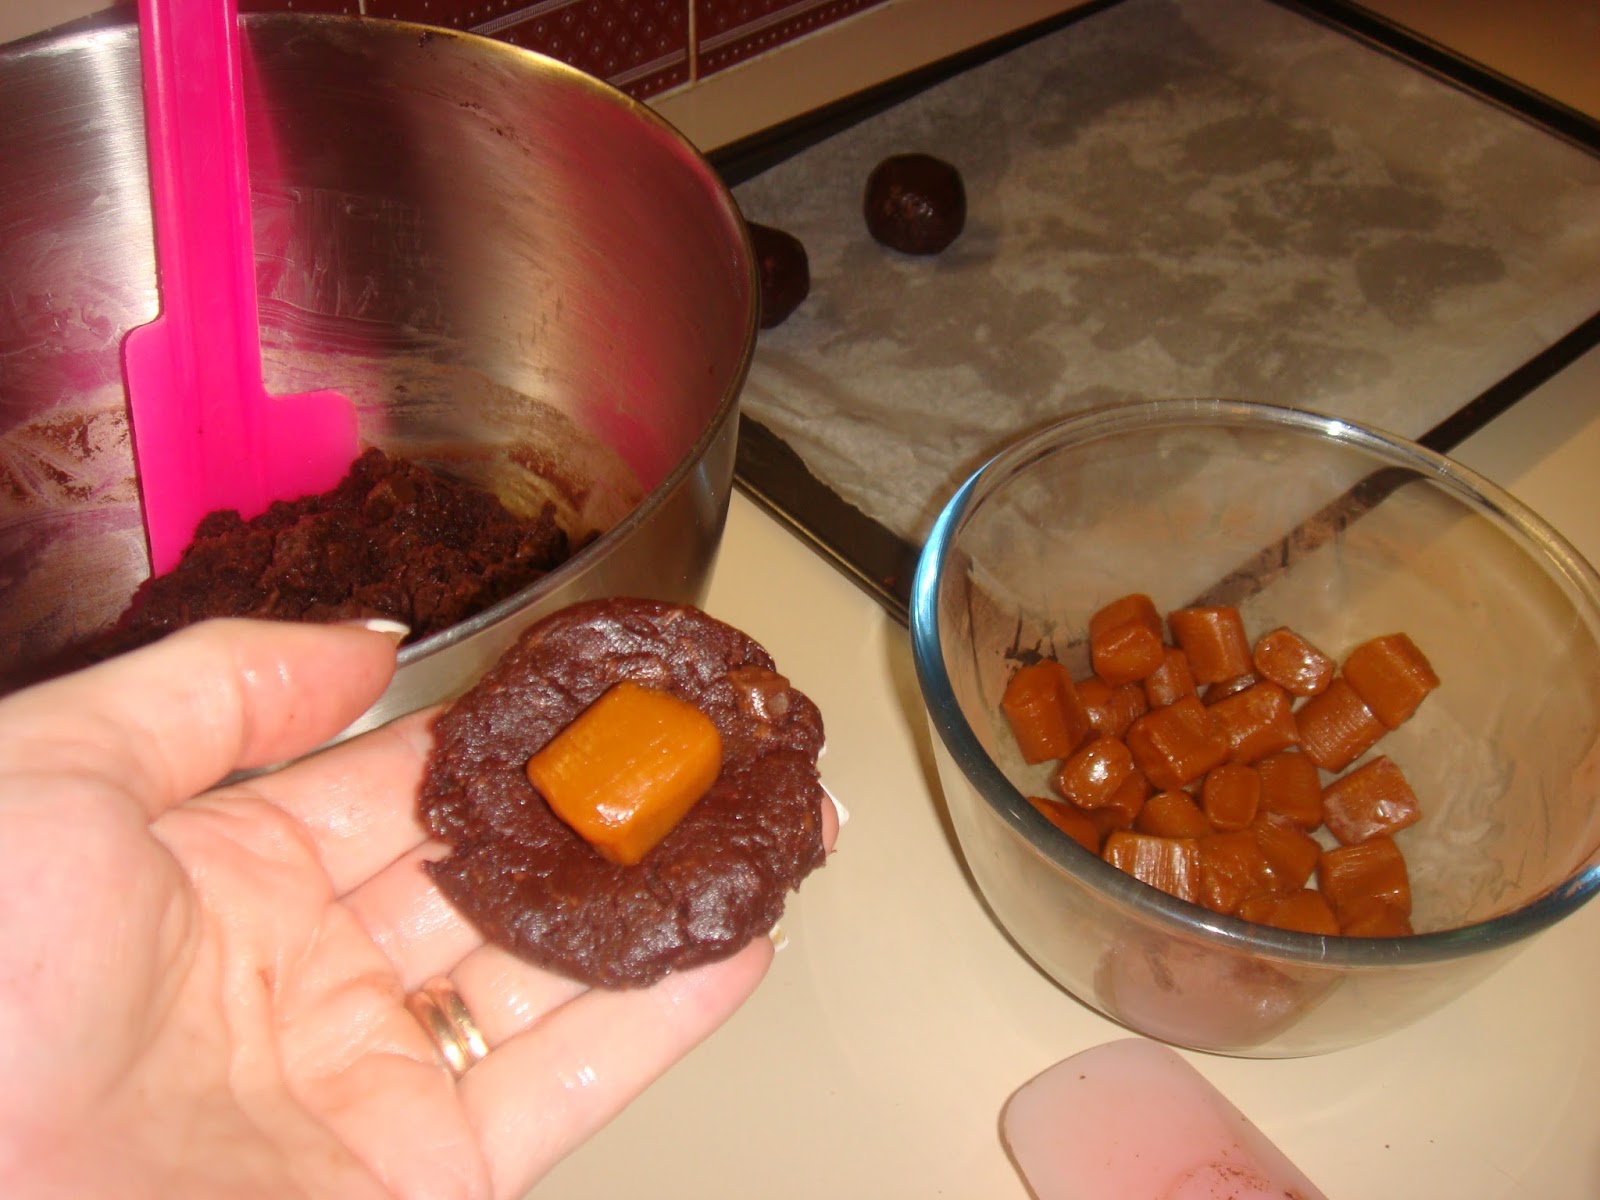
Take out of the fridge and roll a tablespoon size of dough, then dip a hole using yor thumb and pop a half piece of caramel into the dough and roll up into a tight ball.  Place the cookie dough ball onto a baking tray.  Repeat and line tray leaving about 3 inches between each ball to allow for speading as these will become about 2-2.5 inches wide.

Press down on dough balls to flatten slightly.  Sprinkle the tops of cookies with the Fleur De Sel (or sea salt if you cannot obtain).

Bake for 10-12 minutes.

Cool for 15 minutes.

*Note Im late in posting and my recipients will receive this coming week before Christmas.

Tuesday, November 5, 2013

White Chocolate & Raspberry Celebration Cake


Again I am still do Blog Post delayed catch ups, this one is from my daughter's 4th birthday.  She requested raspberry cake.... again. Along with Orange Sponge Cupcakes.  So here is the cake I made for the bottom layer in her Lalaloopsy Birthday Party Cake.

This cake tastes delicious, but I ensure I use a good quality white chocolate, I find the cheaper cooking ones just taste bitter a bit like cardboard.  So my fav is Cadbury Dream, but my 2nd Choice is Nestle Plaistowe.

White Chocolate & Raspberry Celebration Cake

250g Castor Sugar
180g Butter - room temp
465g Plain Flour (less 3 Tbsp)
3 Tbsp Cornflour
3 tsp Baking Powder
3 Eggs
375ml Milk (I used 50% lite milk & 50% Buttermilk) - room temp
270g White Chocolate (Good Quality, I use Cadbury Dream) - chopped
Raspberries - Frozen

Preheat oven to 180 degrees.  Grease
and flour cake tin, I used a 10 inch springform pan.

Cream the butter and sugar together in an electric mixer on medium speed.  When pale and fluffy you can add in the eggs one at a time until fully combined.
Sift your dry ingredients together in a separate bowl and whisk to ensure the raising agent and cornflour are dispersed throughout flour well.

Take your milk and your dry ingredients and add them into the butter mixture in alternative additions, once fully combined take the bowl out of the electric mixer.

Chop your white chocolate up into very fine pieces and stir into the mix with a wooden spoon.  Next take your frozen raspberries and stir them lightly through the batter.

Pour the mix into your prepared cake tin, and place into the preheated oven, and bake for 45-55 minutes.  Always check the centre of the cake with a wooden skewer to ensure the centre is cooked and not raw, this is done by sticking it in when you pull it out it should be clean without mixture stuck to it.  Your should turn out the cake once it has cooled for at least 15 minutes.

Once your cake is completely cold (I usually also placed wrapped in gladwrap/clingfilm into the freezer to ensure it is extra cold), it is ready to frost, ice, ganache and if so desired cover in fondant like I did!

Here is the Dessert Buffet setup I did for my daughter's birthday, we went with a Hot Pink and Sunshine Yellow theme in her favourite doll sesries called Lalaloopsy Dolls.

And.... these are a close up of the uniquely self designed Cookies and Choc-Coated Oreos!
 

And here are the Take Home Favours I made for all the little girls and boys!! Such fun!

I had the designs for my stickers, invitations and tags made through Lala Heaven on Etsy.com, here is her link : https://www.etsy.com/shop/LalaHeaven?ref=search_shop_redirect Katie is fabulous and fast, I found no request too great for her, she even personalised these gorgeous stickers of Dyna-Mite after she met the live doll, for me which I put on boxes of my daughter's favourite treat - Milk Duds!


Tuesday, June 11, 2013

Whole Orange Flourless Sugarless Gluten-Free Cake with a Jaffa Twist


My partner is trying to rid our house of high processed flours and refined sugars, he is fighting a loosing battle, but god love him for trying.  So I am succumbing to attempts at trying to find ways to make delicious cakes with occasionally less sugars.  Then I stumbled and adjusted this little beauty, not only white sugar free and flourless but also gluten free too..... But hey I just can't help it.... I added chocolate frosting sprinkles!

Booyeah!

Whole Orange Cake

(Gluten-Free, Sugar-Free, Flourless)

2 Whole Oranges
6 Eggs
1 cup Organic Honey
250g Almond Meal
1 tsp Baking Powder

Wash your 2 oranges to remove dirt or wax, then place them both into a large saucepan and cover with water and bring to the boil them on a high heat, then turn down to a simmer and cover with a lid. Allow to simmer for 1 hour.  Remove them from the water after the hour and place them on a plate to reduce to room temperature.

Once the oranges are at room temp, cut them in half through cross section, remove seeds, then cut them into 8 pieces, leaving skin on, then place the orange pieces into the food processor, pulse the orange until a puree.


Crack your 6 eggs into the mixer and whisk on high for 5 minutes, this will get them into a high froth of beautiful fluffy pale orange colour.

Then add in your honey and remain beating mix on high to stay fluffy.  Then pour in your orange pulp from the food processor.

Finally add in your almond meal and baking powder and mix through well.

Pre heat your oven to 170 degrees (150 fan forced).  Prepare your springform tin with butter and flour, pour your cake mix into the prepared pan.  Place into the oven and bake for 1 hour.

Allow the cake to cool before removing from the pan.  

Ice your cake with your choice of frosting (or nothing to keep it completely healthy), I went for Chocolate to create a Jaffa flavour.


Saturday, April 6, 2013

Simple & Perfect Vanilla Cake with Chocolate Glaze and Rainbow Sprinkles!

What better way to kick off the weekend than with a simple yet delicious cake that looks so enticing.  I woke up on Friday morning with vanilla cake and chocolate glaze on my mind.... bizarre really because I have always always been a big one for frosting matching their cake! Chocolate on Chocolate, Light on Vanilla, Orange on Orange.... and so on!  So "what the" is with this cake craving to make something so out of my comfort zone.....

I had no idea but my partner got a text message of his regular Friday shopping list (yes I have been getting him to do the shopping to prevent myself from over spending on non-necessities because I am a product of sales and marketing)!

So I have just finished baking and glazing, literally JUST FINISHED!  And I just cannot wait to post it for you all. I'm currently eating the off cuts and it is out of this world, "the partner" even approves and he "doesn't do cake", completely nuts I know, who doesn't like to eat cake??


Perfect Vanilla Cake with Chocolate Glaze

Cake:

5 Lrg Egg Whites (I bought them in a carton and it is 2.5 tbsp per egg required)
1 cup Milk
2 1/4 tsp Vanilla Bean Paste
3 cups Cake Flour (I use the rule of Plain Four and take out 2 Tbsp in every cup & replace with corn flour)
1 1/2 Tbsp Baking Powder
1 3/4 cups Castor Sugar
3/4 tsp Salt
170g Butter - room temp


Use a 12 inch round spring form tin, grease and flour, set aside.  Pre heat oven to 180 (350) degrees. 
Make 1 layer in 12 inch tin or 2 layers in an 8 inch tin. You could also make this in a lamington pan.

BEWARE as this method of cake mixing breaks all my rules but it totally worked!

Measure your egg whites in a medium bowl, whisk lightly by hand and then whisk in a 1/4 cup of milk and vanilla lightly and set aside.


Next sift all your dry ingredients into your mixing bowl.  Using the paddle attachment, mix the dry ingredients for 1 minute. 


Add your remaining milk and the butter to your dry ingredients, and turn on the mixer onto a medium speed and mix for approximately 2 minutes.  Then add in the egg mixture in 2 parts until each addition is mixed in well, approximately 2-3 minutes (no longer).


Pour your batter into your prepared pan/s.  The place in the oven and bake for 45 minutes, check with skewer that it comes out clean from the centre before you remove it from the oven. 

Allow to completely cool before you make the Chocolate Glaze, otherwise when poured on, it will slip straight off.

Chocolate Glaze:

3 ounces Dark Cooking Chocolate - chopped
2 Tbsp Milk
2 Tbsp Butter - melted
1 Tbsp Cream
7 Tbsp Icing Sugar - sifted
1 Egg Yolk - optional (but it gives your glaze the added gloss)

Weigh out your chocolate and butter. 
Combine chocolate, butter, milk and cream in a heat proof bowl and place on a small saucepan of simmering water.  Once melted and you have a smooth chocolate mixture, add in the icing sugar and stir through til completely mixed through.
The egg yolk is optional but recommended to achieve a high gloss.


Once you have the shiney glaze, put it through a seive and discard any lumps.


Now resist yourself from eating the glaze straight from the bowl here, because it needs to get onto the cake!

Slowly pour onto the centre on your COLD cake (chill in the  fridge if you must), and when the weight of the glaze reaches the edge of the top of the cake, STOP pouring, as it will continue to creep over the edge and glide down and your don't want a puddle around your cake.  Leave it a few minutes to settle before adding your sprinkles otherwise they will just sink into the glaze and most will disappear.

I then left it to set for at least 30 minutes so that it cut nicely without the glaze running into the slices as I was cutting.  If really wet then you can give it 10-15 minutes in the fridge just to set it.

Tuesday, April 2, 2013

Easter Candy Leftovers..... Easter Hatched Cheesecake Bars!


Ok so what do you do with a house full of Easter treats and not enough people to eat them all????

Turn them into a scrummy afternoon tea.  This was not a perfect, gorgeous looking dish, but I ate it and it was fun, eye popping cute and sweet!

Enjoy something fun with your over stocked easter candy!

Easter Hatched Cheesecake Bars/Slice

2 Packets Oreos
25g Butter - melted
250g Philadelphia Cream Cheese (1 packet)
150ml Thickened Cream
1 tsp Vanilla Extract
1 Tbsp Castor Sugar
1/2 Lime Rind & Juice - Optional
1 Tbsp Icing Sugar
1 cup Mini Marshmallows
1 cup broken Macaron Shells
1/2 cup small solid Eggs - cut in halves
Dozen approx Speckled MnMs


Place the Oreos in the food processor and process them into a medium crumb mix, then add your melted butter and pulse it through the crumbs until evenly distributed.

Tip out your buttered crumbs into a prepared lamington or brownie tin and press into a firm base, you can use the bottom of a flat bottomed glass to assist in the process in getting a firm flat base.

Place the tin with the pressed base into the fridge for 20 minutes to set.

Place your cream cheese into the (now clean) food processor and process until smooth and silky, then add your cream, vanilla and sugar and process further until it is all thick and creamy.  Add your lime (this is optional but used in the cheesecake to cut through the chocolate you will be adding later.  Place your mixture now into a clean mixing bowl and sift in the icing sugar.

Stir through the icing sugar, marshmallows and broken macaron shells.

Now pour your cheesecake mixture onto the base, smooth it out with your spatula, and then sprinkle more mini marshmallows on top, cut the solid eggs in halves and drop on the cheesecake with the speckled MnMs to decorate nicely with colour explosion! Note - the macaron shells may leach a bit of colour out.

Place back in the fridge for a minimum of 3 hours, I always suggest overnight for best results.

Lift out of the tin and cut into bite size pieces and serve (whilst still cold). 

HOPPY EASTER!