Showing posts with label Cupcakes. Show all posts

Thursday, January 10, 2013

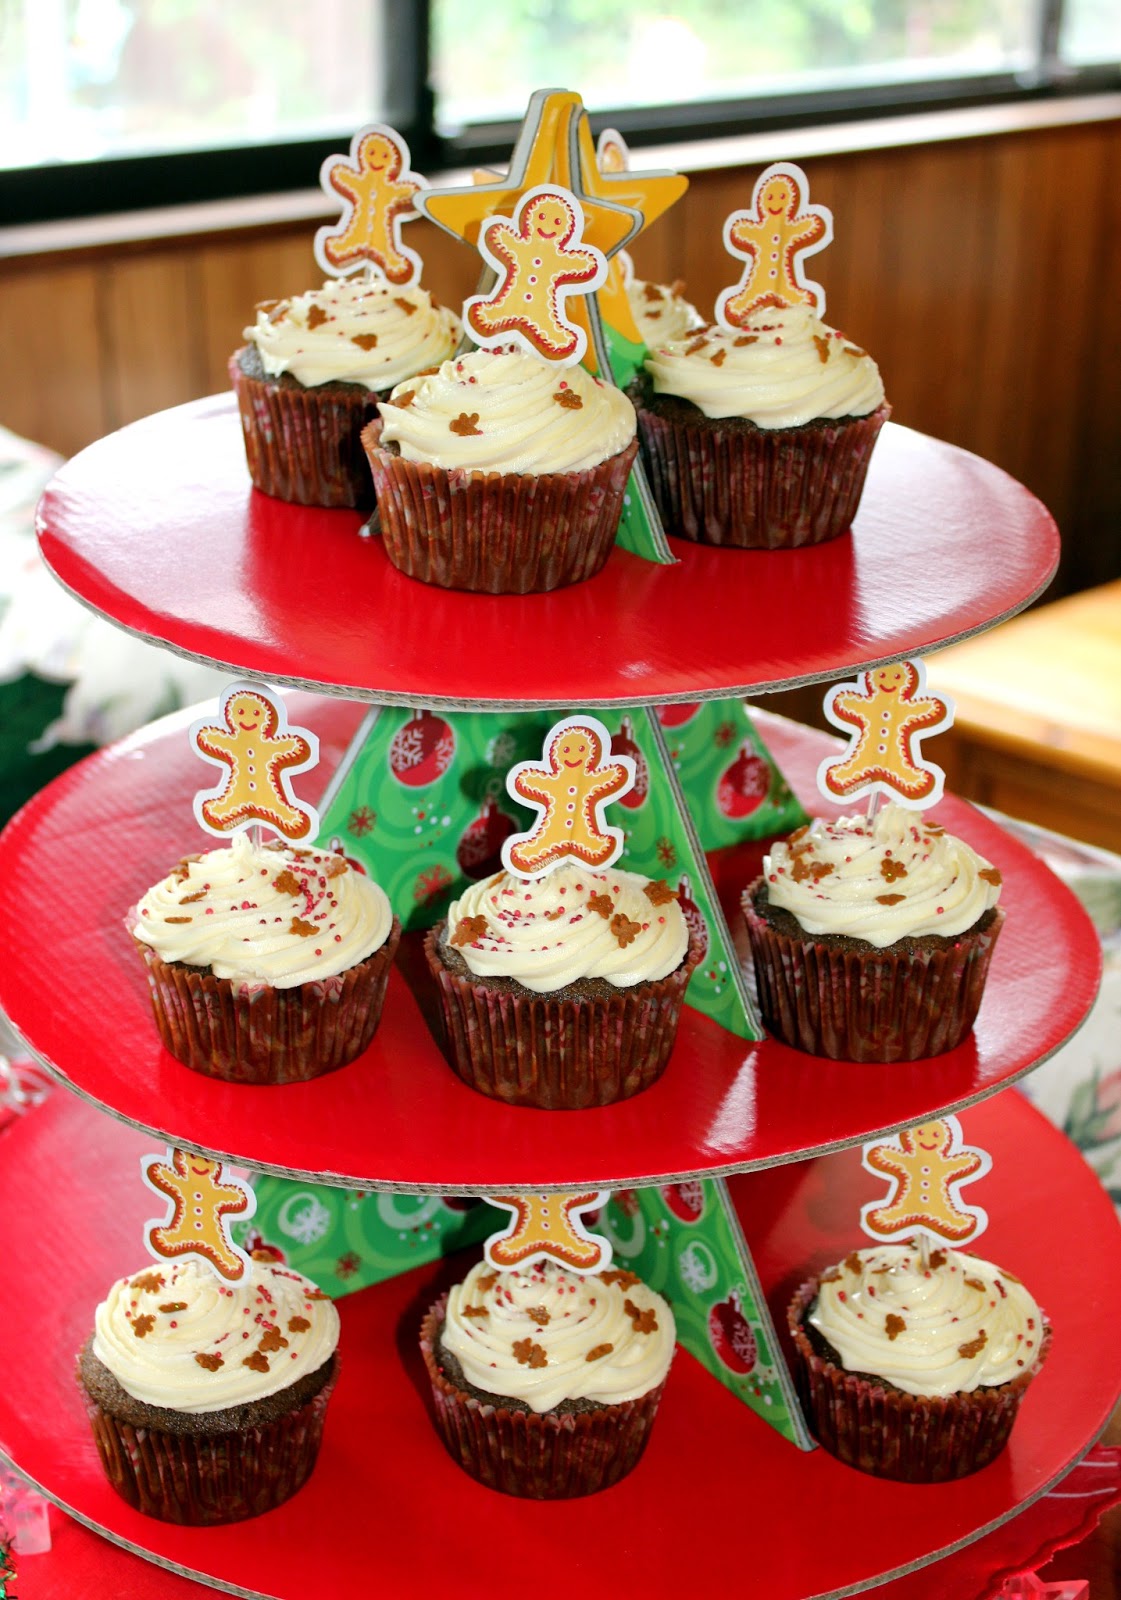
Challenge No 12 - Christmas Gingerbread Man Cupcakes

Month 12 - December
Blog 12 - Tidy Mom http://tidymom.net/

Recipe 12 - Christmas Gingerbread Man Cupcakes http://tidymom.net/2011/gingerbread-cupcakes/

I have no idea what has happened... but I cannot locate any step by step photos I took of making the actual cupcakes %;'&*? What the?? But on the other hand I have some really nice pics of the finished product, and isn't that the main thing? I am certain it is. Ok so I'll stop convincing myself lamely now and apologise to all my peeps for the absence of the step by step pictorial, they are super easy peasy so go for it and bake a batch this holiday season. You will adore them!

Christmas Gingerbread Man Cupcakes


1/2 cup Vegetable Oil
1/2 cup Castor Sugar
1/2 cup Molasses
1 Egg - room temp
1 1/2 cups Plain (all purpose) Flour
1/2 Tbsp Ground Ginger
1 tsp Ground Cinnamon
1/2 tsp Salt
1/8 tsp Ground Cloves
1/2 cup Boiling Water
1/2 tsp Bi Carb (Baking) Soda

Pre heat your oven to 180 (or 350) degrees.  Line your cupcake pan with patty wrappers or grease and flour well.

In your mixing bowl combine your sugar, oil and molasses and put mixer on medium and mix well.  Then add in your egg and mix until combined.

Sift all your dry ingredients into a large seperate bowl, whisk them lightly together, be careful not to whisk much as you will bruise the flour and raising agents.  Gradually add the dry ingredients into your wet mixture and stir through gently.

Boil your water in a small saucepan, once boiled, remove it from the heat and stir in the Baking (Bi-carb) soda.   Whisk it quickly then into your cake batter.

Take your batter and fill each cupcake wrapper approximately two thirds (2/3) full, and tap it on the bench to remove air bubbles and place pans in the oven on middle shelf and bake for 20-25 minutes.  Test before removing from the oven that you cupcakes spring back when touched, or that a skewer comes out clean once put through the centre of a cupcake.

Frost your cupcakes once they have completely cooled down.

The frostings I found most compatible with these cupcakes are a Toasted Marshmallow (preferably boiled) or a Lemon Buttercream.

Sunday, December 30, 2012

Challenge No 8 - Tangled / Rapunzel Cake and Dessert Table

My 3year old's best friend, Miss Lucy turned 3 and after catching sight of one of Marley's birthday cakes we had with my family, she wanted nothing else than a Rapunzel themed birthday party. So I set out to fulfil that wish for her.

Unfortunately her licensed Table cloth, plates, napkins and banner didn't arrive and got lost in the mail, that have resent it but that arrived a month late.... so now I have spares for the next Tangled Party! Any takers?


CAKE


The cake was the most fun to create.  I made it in 3 coloured layers, flavouring each layer to match
Mauve - Grape
Yellow - Lemon
Pink - Raspberry

Put together with double lemon buttercream (in lilac).  And the tower was created using chocolate cupcakes, with 2 skewers holding them together on top of the cake. The piped the mauve buttercream all over to blend them together.  I printed off some edible icing sheets with images that i used such as Rapunzel in the window on the tower.  The roof of the tower was a miniature ice cream cone, and then coated in Candy Melts and covered it in purple Wilton jumbo sprinkles.  I then piped out all of the green with the grass tip. And the name was made from fondant with cutters.

COOKIES


I decided to go with a sun/star shape that resembled the symbol in the movie for the "lost princess", I kept them simple as I was making the entire dessert table contents, so I just covered them in mauve fondant. I printed off two different Tangled images onto edible icing discs and adhered them to the fondant and then sprinkled in gold edible glitter for effect and tied them in cello bags.

JELLY + MARSHMALLOW CUPS


I just made a simple creaming soda flavoured jelly in a 3 litre container/bowl, set it for 6 hours (preferably overnight) and then diced it up and filled some mauve crystal plastic dishes for added princess sparkle.  I topped each dish with a scoop of marshmallow topping and added matching sprinkles.

CUPCAKES

I adapted a recipe from a great blog, called Always With Butter.
RECIPE:
1 1/4 cups Plain (all purpose) Flour
1 tsp Baking Powder
1 1/2 tsp Ground Cinnamon
1/4 tsp Ground Ginger
1/2 tsp Ground Nutmeg
1/2 tsp All Spice
1/2 tsp Ground Cloves
1/2 tsp salt
1 1/2 cups Castor Sugar
6 Tbsp Butter - melted and cooled
2 Eggs
1 tsp Vanilla
1 cup Pumpkin Puree
1/3 cup Water

Preheat oven to 180 (or 350) degrees. Line cupcake pan with wrappers.

Sift all the dry ingredients into a medium bowl and set aside.  Place butter and sugar in mixing bowl and cream using mixer on medium.  Add in an egg at a time to the mixer, then the vanilla and beat it well.

Add the pumpkin puree (I make my own from fresh pumpkin and boil it in saucepan of water until it is soft enough to put through a food processor and liquefy) and mix thoroughly.

Add the dry ingredients in three parts to wet mixture until just mixed through. Do not over beat.

Spoon mixture into cupcake papers, filling approx  two thirds full.  Bake for 20 minutes.

Makes 12-20 small cupcakes or 12 large (muffin size) cupcakes.


Monday, December 10, 2012

Lets kick off the Silly Season with Rudolf Cupcakes!

HO HO HO Merry Christmas...... I can hear Santa preparing his sleigh already for his Elves to fill with goodies for all the good boys and girls worldwide!  And in light of this excitment I am kicking off this Silly Season with a fun cupcake to do that the kiddies will all love!!


Because who doesn't love a fun, happy, giggley reindeer that we all know and love? Noone? Excellent! 'Cause I have just the activity and you can even get the kidlets to help you.

I used my personal recipe I always follow for a great chocolate cake as its dark and fluffy and super quick, my Miss 3 often assists in the mixing stage, and as opposed to a dense chocolate cake its great for cupcakes.  I came up with these after I found a packet of chocolate coated pretzels at the shop that I thought looked just like antlers!

I am entering this Rudolf the Red-Nosed Cupcakes in the Creative Holiday Recipe Contest hosted by Kristan at Confessions of a Cookbook Queen and Shelly at Cookies and Cups! Just because I follow them both religiously and love to bake there prized blog posts myself... I feel honoured to be able to share one of my recipe creations on their Blog with you all.  In fact I have only just posted today a whole Christmas Post on Food Bloggers I LOVE! Kristan & Shelly are right up there, dont miss the post for a great lot of Food Bloggers to enjoy...

Rudolf the Red-Nosed Cupcakes

Cake (OR you can use a Betty Crocker Packet Cake Mix in Devils Food):

1 3/4 cups Plain Flour
2 cups Castor Sugar
3/4 cup Dark Cocoa Powder
2 tsp Bi-carb Soda
1 tsp Baking Powder
1 tsp Salt
1 cup of Milk
1/2 lemon - squeezed
1/2 Vegetable Oil
2 Lrg Eggs
1 tsp Vanilla Extract
1 cup Boiling Water

Decorating :

Tub of Chocolate Frosting
Red MnMs (or skittles)
Chocolate Coated Pretzels
Icing Eyes (Wilton or similar)
Snouts (I used my Gingerbread Cookie recipe, but you can use a store bought small round cookie)


Preheat oven to 180 (350) degrees. Grease and flour your cake tin or line cupcake pan with patty cake wrappers.

In a medium bowl sift together the flour, sugar, cocoa, bi-carb, bakign poswer and salt. Set aside.

Fill jug with 1 cup of milk and squeeze in the lemon juice and set aside (this will curdel like yoghurt) leave for 5-10 minutes.

Crack your eggs into the eletric mixer and whisk until foamy, then add in your vegetable oil and vanilla and mix well for 3 minutes.  Add in the milk concoction and mix well.  I suggest to change your beater from a whisk attachment to the paddle.

In 3 instalments add in the dry sifted ingredients and mix on a low setting. Once just mixed (do not overmix) then add in the cup of boiling water and I recommend stirrign this through with a spatula, ensuring you are scraping mix from the bottom so with all ingredients are mixed in well without a risk of over beating, as this will cause it not to rise.

Pour your mixture into your patty cake wrappers, I use 2 soup spoons to fill wrappers and I fill them 1/2 - 3/4 to the top with batter.

Bake in the oven for 20-25 minutes.

Once completely cold, you can begin to decorate as follows :


I cheated... shhhhhh... I used a tub of Betty Crocker pre-made Chocolate Frosting to save time at Christmas Crazytown time.  Soooo cover your cupcake in chocolate frosting and stick the snout onto one side of the top of the cupcake.

Next add your eyeballs and antlers (pretzels)!

Finally arrange on a fabulous cupcake stand to show off your hours (cough cough - not) of hard work creating these babies!!


Thursday, September 6, 2012

Minnie Mouse Dessert Table & Party for Miss 3!


My little girl just turned 3, and her wish was for a Minnie Mouse Birthday Party, she absolutely adores Minnie Mouse (and Mickey of course). And of course it had to be PINK!  So off I went in the planning stages to plan it with all the bells and whistles.

I run a Cookie Business from home, and I am really hoping to get into doing more Dessert Tables as part of my baking business.  I love doing dessert tables!! They are huge, alot of planing, very imaginative and even more baking but the result is awesome and very rewarding. Children and adults alike love a Dessert Table.

The choices and options are endless, the menu I had was a centrepiece as the Minnie Mouse two layer cake, then we had themed Cupcakes with Italian Meringue in spotted collars, Minnie Cookies with the edible images on them, Ice Cream Cake Pops, Fairy Floss (Cotton Candy) in the jars, Push Pops with Double Chocolate cake/Raspberry Mouse/Meringue/Fresh Raspberry, Minnie Silhouette Bubblegum Macarons and Pink Mini Toffee Apples.

I simply decorated with two big Minnie Mouse helium foil balloons (one each end of the table) and a wall decal I order through ebay that I reused in her bedroom (or could be used on the door).

The kiddies table was all fitted out with the themed table cloth, plates and napkins.  I filled glass mini milk bottles with Raspberry alternative to Ribena with the hot pink & white paper straws. Each place setting had a mini pink toffee apple for each child to take home and to the apple stick I tied a lollipop themed pink & white balloon to it that each child got to take home as an extra surprise.

I hired the child size trestle table and kiddies coloured chairs from Little Ones Party Hire, they were perfect and added a great element to the room, the colour range is wide and you can get all one colour or mixed.

Pin the Bow on Minnie Mouse was played, along with Pass the Parcel, Musical Chairs and Statues with the latest tunes that turned into a kiddies dance off to Party Rock Anthem by LMFAO.


I ordered something a little extra special for the Party Favours, miniture Picnic Baskets, filling them with tiny fizzy and gummi lolles and a Minnie Mouse Funfetti coloured cookie with the black silhouette face and hot fuschia bow. All done up in ribbons and thank you cards. I bought the Picnic Baskets and Lollipop coloured Balloons through Bon Bon Boutique, the girls were gorgeous to deal with here, as I had a week's delay through a Melbourne based site and had to cancel the order and found Bon Bon Boutique to be beyond fabulous in there Customer Service, a hard find these days.

My Minnie Mouse themed Birthday Cake was a bottom layer of Double Lemon and Raspberry with raspberry Buttercream and the top layer was a 70% Cocao Double Chocolate Cake by Miette Bakery San Francisco with Ganache then both covered and decorated in Satin Ice fondant.

The Cupcakes were a Vanilla and Raspberry cake and topped with Italian Meringue Buttercream and alot of sparkle. Then placed into Hot Pink with tiny pin spot Collars, bought from Baking Pleasures.

The gorgeous and most delicious Macarons were made as a custom order in black silhouettes with a Bubblegum filling, by Leah at Half Baked Tart.  These were Marley's deemed most favourite party food item, she absolutely loved them and was the first item she grabbed as she finished blowing out her cake candles! Dont worry about my hours of baking :-( but I understand in the mind of a 3 year old, she dove into the one thing her mother doesn't make on a regular basis.

The Ice Cream Cake Pops looked very effective, I made them with funfetti cake, and white chocolate and topped with with coloured jimmies (American sprinkles) and a Shimmer Sixlet (also American that I order from the USA regularly). I bought a special stand which in my pending USA trip I will purchase a 2nd one for the pair (maybe more but Shhhhhh dont tell anyone)!

Cookies were simple but effective.... a large Mickey silhouette in cookie dough filled with hot pink, black & white jimmies, then topped with a Hot Pink fondant cut out, then I place on with sugar syrup a Minnie Mouse edible image.  All cookies were served in cellophance bags tied with matching satin ribbons.

Finally were the Push Pops, a dessert table item becoming very popular in deed, they are a plastic cylinder with a stick handle and you can push the food up as you devour it.  I always serve mine with spoons so you can tuck into them with gusto! The idea is to layer the contents with cake, crumble, meringue, buttercream, cream, curd, mouse etc the options are endless and they are clear so you usually consider the colour or appearance.  Mine consisted of Double Chocolate Cake, Raspberry Mousse each layered up twice, then topped with italian meringue and a fresh raspberry on top (and a pink of hologram edible glitter). I love the wooden spoons, you can stamp the handles as an additional touch. There are stands you can buy or get made but i usually use these adorable boxes and they fit 6-8 in them perfectly.

So for your Party, Cookie, Cake or Dessert Table needs to make your next event a hit, contact me (Traci) at :

Cookie Queen Kitsch'n

Email - cookiequeen@y7mail.com
Ph - 0404 741 790 (or 61 2 404 741 790)
I am based in Sydney. Minimum order of Cookies are 12, Cupcakes are 24, other items on application.

I look forward to making your next Party extra special!!

Monday, April 30, 2012

Challenge No 4 - Creamy Coconut Cupcakes with Peach Swiss Meringue Buttercream


I have had this recipe on Haniela's Blog open on my desktop for over a month starring at me, begging me to bake it. So today when Miss Two said "can we bake cupcakes Mummy pleeeeeeease"! I know I could hold out no longer.  Little did I anticipate what a hectic afternoon I would have and it momentarily slipped my mind  that Miss Two makes any baking process quadruple in time.

So with my ingredients in hand....

And a helper at the ready....

I set off to make some seriously delicious cupcakes!

Creamy Coconut Cupcakes with Peach Swiss Meringue Buttercream

(be mindful I can't stick to a recipe if you paid me so you will notice a few differences to Haniela's)

5 Tbsp Butter - room temp
3/4 cup Castor Sugar
2 Med (or 3 sml) Egg Yolks
1.5 tsp Coconut Extract (I used Lor Ann's)
1 tsp Vanilla Extract
1 1/4 cup Cake Flour (see method - you will need corn flour)
1 1/4 tsp Baking Powder
Pinch Salt
1/4 cup milk
1/2 cup Unsweetened Coconut Carnation Milk
3 Egg Whites

Preheat oven at 180 degrees (or 160 fan forced).

First step is to separate and place the egg whites into an electric mixer and whip them on high until they are soft snow white peaks.  At this stage take a 1/4 cup of the castor sugar (leaving 1/2 cup remaining) and add gradually into the egg whites, a tablespoon at a time, beat well between each addition. Once the egg whites are ready put them into a separate bowl and set aside.

In the same bowl the egg whites were whipped in, place your butter and castor sugar (remaining 1/2 cup) in the bowl and cream them until light and fluffy.  Next add in the egg yolks, vanilla and coconut extracts, and mix them in well.

Sift the dry ingredients into another separate bowl. To make Cake Flour, measure out the cup of Plain Flour, remove 2 tablespoons of the Plain Flour and place them back in the container, replace them with 2 tablespoons of Corn Flour. Whisk the dry ingredients together lightly so the raising agent is distributed throughout.

Combine the milk and coconut milk together, pour a 1/3 of milks into the butter mixture, alternating with adding a 1/3 of the dry ingredients. Mix well.  Add remaining milk and then dry ingredients and continue to mix well.  When ingredients combined thoroughly, turn off the electric mixer, take the whipped egg whites ad fold gently into the rest of the mixture. Once mixed through, spoon the mixture into the cupcake wrappers 2 thirds of the way up them. Tap them on counter top to level them.

Place tray into the oven and bake for 20 minutes.

Makes : 12 medium to large cupcakes

Peach Swiss Meringue Buttercream

2-3 Egg Whites
1 cup Castor Sugar
250g Butter - room temp
Flavouring - 5 drops Lor Ann Oil

Place a saucepan of water and bring to a simmer. With egg whites and sugar in a heatproof bowl, place the bowl onto the saucepan, and commence whisking vigorously (preferably with a barmix or like).  Once the egg white mixture is too hot to touch, remove from the heat, tip into the electric mixer bowl, and whip for 3 minutes on high until it forms soft white peaks. cube the butter and add in one cube at a time. Ignore if it curdles, keep whipping, it will come back.  Add flavour and and colour tint finally and your ready to pipe it onto your cooled cupcakes.

Quantity should cover 12 comfortably.


Sunday, September 11, 2011

Hunka Hunka Burning Love!!!

Anyone looking would think I have the Elvis fetish.... I don’t... but he intrigues me, in fact the whole Elvis Phenomena has me momentarily spellbound.

The craziness of it all, I mean yes he was a fantastic singer, writer, performer, entertainer etc and he was ground breakingly daring for his time, but the fans are mental! They are. Really.  Who on earth lays dead for over 30 years of a heart attack in the prime of their career and “fakes it”??  Seriously people, the sightings at the burger joints are definately hilarious, but it draws you right in with the conspiracy theories. Is he or isn't he??

I also have to confess.... I have a dislike to animal print, you will rarely see me condone it, especially when it comes to children. myself or house furnishings.... I once sent my partner to buy a cat scratching/hammock pole thingie with one single rule to remember... “NO Animal Print” and what did i get?? Yes... Leopard print... O.M.G. hideous! (Apologies to anyone you does like animal print) Rock & Roll, Hot Rodding and the Zoo are the only places this belongs... Elvis does fall into the allowance (under the rock & Roll banner). And it really suited the Hunka Burning Love Cupcakes I baked!! 


I have made Elvis Cupcakes on two occasions, once were the Hunka Burning Love Cupcakes I am providing you with the recipe below, and the second Cupcakes were vanilla Cupcakes with Pineapple Buttercream and decorated in the Elvis theme for a 40th celebration.

I hope you enjoy making these as much as I did!

Hunka Burning Love Cupcakes

Banana Cupcake
125g unsalted butter, melted
3/4 cup castor sugar
2 large eggs
½ teaspoon pure vanilla extract
1 ½  cups all-purpose flour
1 teaspoon baking powder
½  teaspoon baking soda
pinch of salt
2 ripe bananas

Peanut Butter Cream Cheese Frosting
2-3 tbsp smooth peanut butter
250g packet cream cheese, softened
2  cups icing sugar mixture
1 tsp vanilla

Topped with Maple Syrup Glazed Bacon and a drizzle of Maple Syrup (honey can be substituted)

Pre-heat oven to 350’ or 180’.
Cream butter & sugar together with electric mixer, approximately 3 minutes. Add eggs one at a time and then the vanilla, beat until combined and fluffy.  In a separate bowl sift in all of the dry ingredients. Then mash up the bananas with a fork and add them into the mix.  Next add half the dry ingredients into the egg mixture, mix until just combined.  Add in the milk and then the 2nd half of the dry ingredients.  Be very careful not to overmix as you will bruise the flour and it will make a tough cupcake without spring in its step!

My trick is ‘soup spoons’ using the font of one to scoop the mix out and the back of another to push the mix off the 1st spoon into the patty cake wrapper.  Use 2 spoons of mix into each patty cake wrapper, 2/3 full. Bake for approx 20, just lightly firm to touch with a quick spring back.

Let cool before frosting.

To make the frosting add all the frosting ingredients into the mixer and use the paddle attachment. Mix into a whipped cream consistency, and then its ready to pipe onto the cakes.

For the bacon topping, slice the rashes (2) into 1.5 inch squares, heat frypan and drizzle approx 1-2 tablespoons of maple syrup into the pan first and heat.  Next add the bacon and pan fry until golden and crispy.

Top your cupcake using a closed star tip, and insert your crisp of bacon and lightly drizzle with about a ¼ - ½ teaspoon of maple syrup.

I got 18 small size cupcakes from this mix, otherwise it would get 12 large cupcakes.